

What Size Pictures Are Best For Uploading To A Website
Whether you have a concern website, portfolio, or online shop, information technology pays to optimize each paradigm you upload.
When we talk about how to "optimize" images for the web, y'all tin can think nigh this in three ways: 1) making images wait good, 2) making images load rapidly, and 3) making images easy for search engines to index.
Most posts go over one aspect of image optimization or some other, but in this post I'll cover them all. Even better is that you tin optimize images with costless, piece of cake-to-use tools and a website builder.
Acquire how to start your ain website today!
1. Outset with loftier-quality images
Stock photography: You lot don't accept to be a professional lensman to use great images on your website. Every day information technology seems like there are more high-quality stock photo sites where you can download free photos for commercial use. Some of our favorites are:
- Pixabay
- Unsplash
- Befouled Images
- PicJumbo
- SplitShire
- Piffling Visuals
- …and with a Jimdo website, free stock images are available correct in your Image Library.
When you download an prototype from a stock photo website, it volition likely exist a really large JPEG file. To compress it for your website, you'll demand to reduce the size and upload a smaller version (more on that below). That's ok. Starting with a big format is ideal, considering you tin ever brand a large prototype smaller. (Making a small image larger won't work).
Taking your own (improve) photos: Of course, you tin can't use stock photos for everything (like your team or product). In that location are a few easy tricks to make your images look well-lit and more professional, fifty-fifty without fancy camera equipment (like this tutorial on creating your own light box).
Graphics: If y'all're looking for something more graphic-based, there are a ton of new, costless online tools that you lot tin use to build your own infographics or photos with font overlays. We love Canva and PiktoChart.
Logo: If y'all're looking for a logo, we recommend checking out our Logo Creator. You tin can try it for gratuitous.
Design a logo that makes your business organization stand out.
ii. Use the correct file blazon: JPEG or PNG
If you're wondering about different image files similar JPG, PNG, GIF, and SVG, just know that on your website y'all're most probable to utilise a JPEG (JPG) or a PNG format. There are pros and cons of each, simply for most cases you can think the following:
- Photographs should exist saved and uploaded as JPGs. This file type tin can handle all of the colors in a photograph in a relatively pocket-sized, efficient file size. By using JPEGs, you won't end up with the enormous file y'all might get if you saved a photograph every bit a PNG.
- Graphics, especially those using large, flat areas of color, should exist saved as PNGs. This includes most designs, infographics, images with lots of text in them, and logos. PNGs are higher quality than JPEGs, merely typically come with a larger file size, too. Like their relatives, the SVG file, PNGs deal with areas of colour and text with squeamish crisp lines, so yous can zoom in and not lose whatsoever quality. They also back up transparent backgrounds (which you'll want if yous're using a logo). If you have a choice, we recommend saving PNGs equally "24 bit" format rather than "8 bit" considering of the better quality and richer array of supported colors.
Learn how to start your own website today!
What if you're using a photograph with text over information technology? If the bulk of the prototype is a photo, then stick to a JPEG.
Most uncomplicated epitome programs let you choose JPG or PNG past going to "Save As," "Export," or "Save for web" and choosing the blazon you adopt. In that location are also complimentary browser-based online tools like Zamzar that will catechumen files for y'all.
You can catechumen a PNG to JPEG, but yous don't proceeds anything past converting a JPEG to a PNG file. That's because a JPG file is already stored in what'south called a lossy format—the image information has already been lost when information technology was compressed, and so you lot can't magically bring it back.
3. Resize images to optimize page speed and appearance
With web images, you want to find the right balance betwixt size and resolution. The higher your resolution, the larger the file size will be. In the world of impress, high resolution images are a good thing. But on the web, large images can slow down your website'due south page speed. This hurts your users' experience and, somewhen, your search engine ranking. Big images and deadening load times are specially annoying for mobile visitors.
In this mail service I'll mostly demonstrate with the free browser-based version of Pixlr, which is a simple tool for bones image editing. If you're interested in other tools, check out our post How to Edit Photos Without Photoshop.
What is the ideal image size for a website?
How do you strike the right residual between size and quality? Get-go, it's important to empathize that when it comes to images, "size" is a relative term. What you lot demand for print is unremarkably much much larger than what yous need for a website. Here's an overview of the three principal aspects that make up "size":
- Optimal file size: the number of bytes the file takes upward on your figurer. This is the factor that can dull your website style down. A 15MB (megabyte) image is huge. A 125KB (kilobyte) image is much more reasonable. If your file size is actually big, it's an indicator that either your image dimensions are as well large or the resolution is likewise high.
- Prototype size: The bodily dimensions of your image, in pixels. You probably call up of traditional printed photos every bit 4×6, 5×seven, or 8×10. But on the web, the height and width are measured in pixels. Then for instance, a typical prototype on a website or blog might exist 795×300 pixels.
- Resolution for web images: Left over from the world of impress, resolution is the quality or density of an epitome, measured in dots per inch (dpi). A professional printer might require images to exist at least 300dpi. Merely almost estimator monitors display 72dpi or 92dpi, so annihilation higher than that is overkill and makes your image unnecessarily large. When a design plan has the selection to "salve for web", it means saving it at a depression, spider web-friendly resolution.
How do yous find the file size, image size, and resolution of your image?
You can find the file size and prototype size correct on your reckoner. If yous're on a PC, right-click on the image file, choose "Properties" and then the "Summary" tab. On a Mac, Ctrl+click on the paradigm file and choose "Get Info."
Finding the resolution requires a more advanced photo plan similar Photoshop, but most basic image editing programs volition automatically salvage images at a lower, spider web-friendly dpi that'due south a ameliorate resolution for web images.
Quick guide for image size, file size, and resolution
Now that y'all know the unlike ways to describe an image's size, here'due south a few rules of pollex to go on in mind:
- Optimal file size: Big images or full-screen background images should exist no more than 1 MB.
- Most other modest web graphics can exist 300 KB or less.
- If you're using a total-screen background, Jimdo's Customer Support Team recommends uploading an prototype that's 2000 pixels wide.
- Resolution for web images: If you have the pick, ever "Save for web" which volition give your image a spider web-friendly resolution.
- You tin make a large paradigm smaller, simply it's very hard to brand a small image bigger. It will look fuzzy and pixelated.
Looking to get-go your portfolio website?
What practice you do if your paradigm is too big for your website?
If you lot accept a prissy digital photographic camera, you might be taking photos that are several megabytes large—mode bigger than what y'all need for your website. Stock photos from high-quality sites tend to come with large file sizes too. If your image is over ane MB, in that location are a few things y'all can do:
- Resize the epitome. If your photograph is 5000 pixels broad, you can easily resize it to 2000 pixels wide, 1200 pixels broad, or even smaller depending on how you plan to use it on your website. This will significantly reduce the file size. When yous resize, make sure to continue the proportions the same so you don't distort your image.
- Reduce the resolution. Most photo programs will automatically compress your image resolution to a "spider web-friendly" size (72dpi and 92dpi, respectively). You can do this in Photoshop too with the 'save for web' pick. You tin likewise "Save Every bit" in many photo programs then adjust the quality level from there.
- Compress your epitome with a costless program like TinyPNG or TinyJPG. Both volition significantly reduce your file size without interfering with the quality.
4. Make images the same size and style
Images on a web folio will look better if you apply a consistent mode and size. Consistency will also aid when lining up your text, columns, and other data on your folio. To see what we mean, have a look at the examples below.
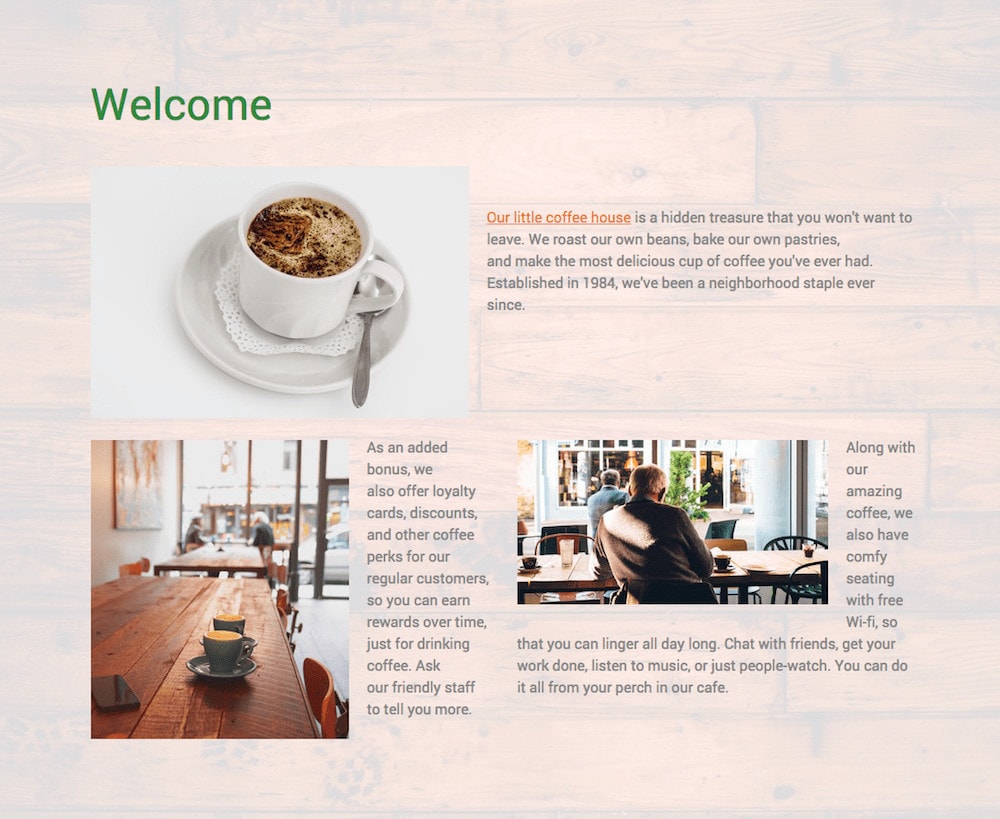
In the starting time one, taken from our make-believe "Brand-Believe Java" website, the photos are all different dimensions. One is oriented vertically, while the others are horizontal. This makes the page wait disorganized.
In the next case, I cropped each photo to a more uniform yard×760 pixels. The top photo of the bright white coffee mug felt out of place, so I replaced it with ane that was similar in mode and color to my 2 other photos. I also experimented with the prototype filters in Jimdo and put in a subtle overlay over each photo (sort of similar an Instagram filter) to give them a more consistent look.
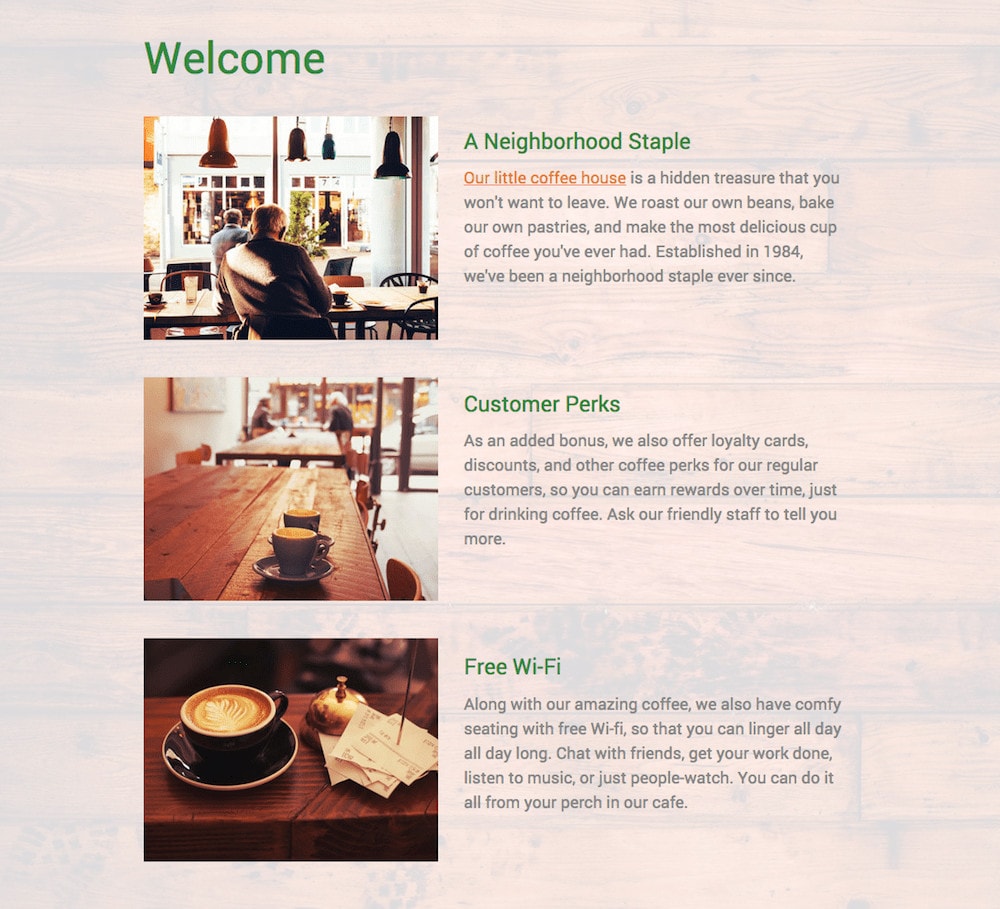
Since the photos are all the aforementioned size and oriented the same way, they all fit perfectly in i cavalcade, with my paragraphs in another. No adjustments or guesswork needed!
And recall, with a Jimdo website, your images are automatically imported and arranged perfectly, so you don't have to worry about your design.
Ok, now that your photos are resized and looking great, how can y'all optimize them for search engines? On Jimdo websites, much of the SEO housekeeping is taken care of for you, only there are still a few tweaks you can make to optimize your images.
5. Name the image file correctly to aid your SEO
Most people don't think much about their file names. They may call a photo "Photo1.jpg" or "Screen Shot 2021-06-02 at 3.41.15 PM". If this sounds familiar, take a moment to rename your images before you upload them to your website. Why? Because doing then makes your photos easier to manage. Depending on where the images appear online, it tin also give your SEO a boost.
For consistency's sake, utilise lowercase letters and numbers 0-9. Don't introduce punctuation or spaces. And information technology's best to use hyphens rather than underscores. (Recollect eiffel-tower.jpg rather than DSC12345.jpg).
Note: On Jimdo websites, you don't accept to rename all the files on your website—only update your Alt Text (run across below).
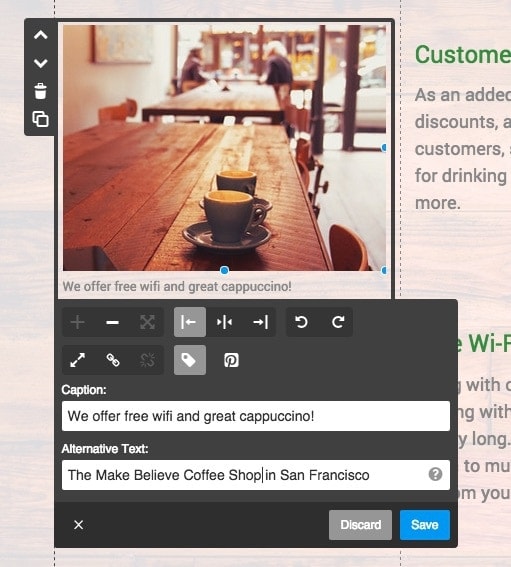
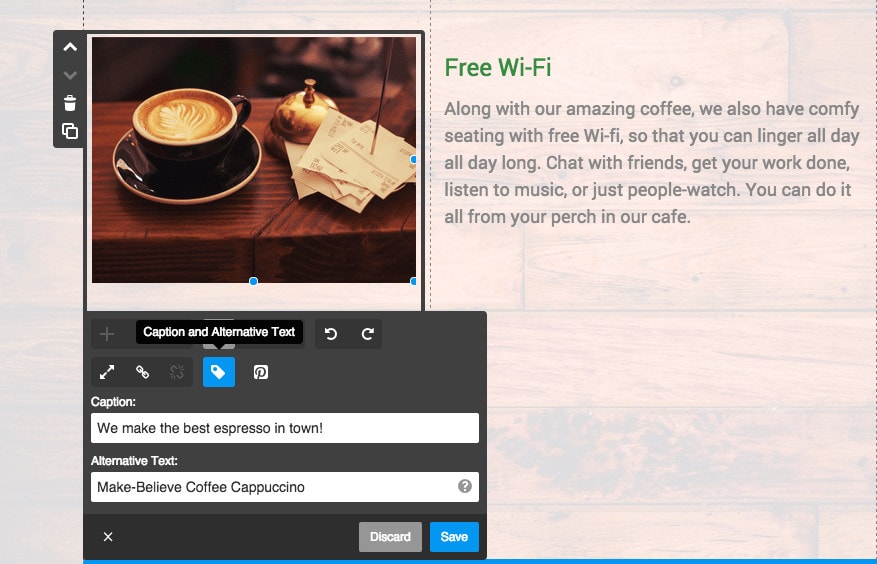
6. Fill out your captions and culling text
Once people upload an image to their website, they frequently forget to fill out the additional data. Merely merely similar the file name, this info gives yous some added SEO juice.
Alt tags (or culling text) won't be visible to your average visitor, simply they requite search engines a basic idea of what each image is virtually. So once y'all've added an image to your site, exist sure to fill up in the Alternative Text field with a phrase that describes what the photo is showing, preferably with a targeted keyword. (Alternative text also helps visually impaired visitors navigate your site with audio-based software, so it'southward a nice way to amend website accessibility.)
If it makes sense, too add a caption to your image, since people read photo captions more other website text.
Note: Filling in alt tags, names, and captions is expert for SEO, but don't endeavor to keyword stuff. You merely want to accurately describe an image in plain language—adding irrelevant or repetitive keywords will become you penalized by the search engine.
seven. Put the image near relevant text
Choose images that are related to what the text is proverb, rather than something completely out-of-the-blue. An prototype that is surrounded by relevant information (with related keywords) volition rank ameliorate.
This tip besides helps you avoid stock photo cliches. If your website is well-nigh education, you don't get any SEO boost from having a photo of an apple. Photos of teachers, students, and classrooms will be more interesting for readers and more relevant to your subject area matter.
Summary: Optimizing a website image
So let's await at these rules with an example from my Make-Believe Coffee website. I establish a photo of a coffee mug on Unsplash. When I downloaded it, the name was "fN6hZMWqRHuFET5YoApH_StBalmainCoffee.jpg" and information technology was 2509 x 1673 pixels. Its size was 586KB. Not terrible, but still much larger than I need for simply displaying as a small photo on my web page. And then for ameliorate image optimization, I would practice the following:
- Rename the prototype to something that makes more sense. Peradventure something like make-believe-coffee-cappuccino.jpg
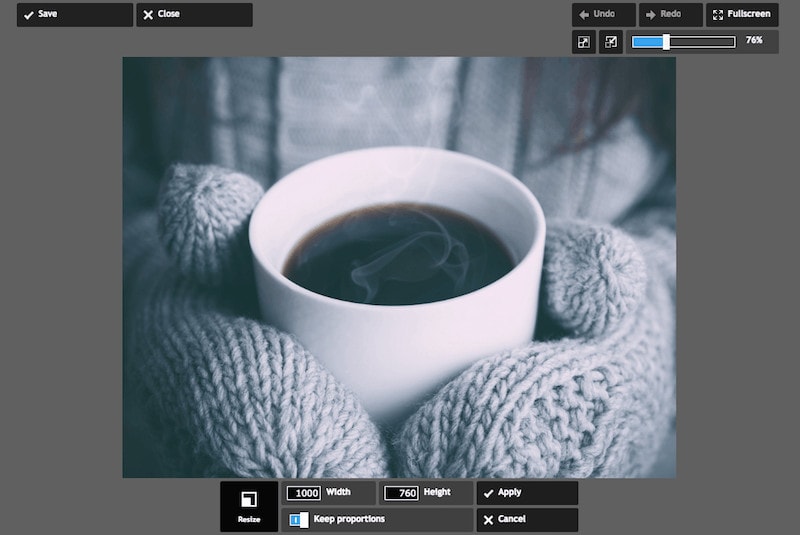
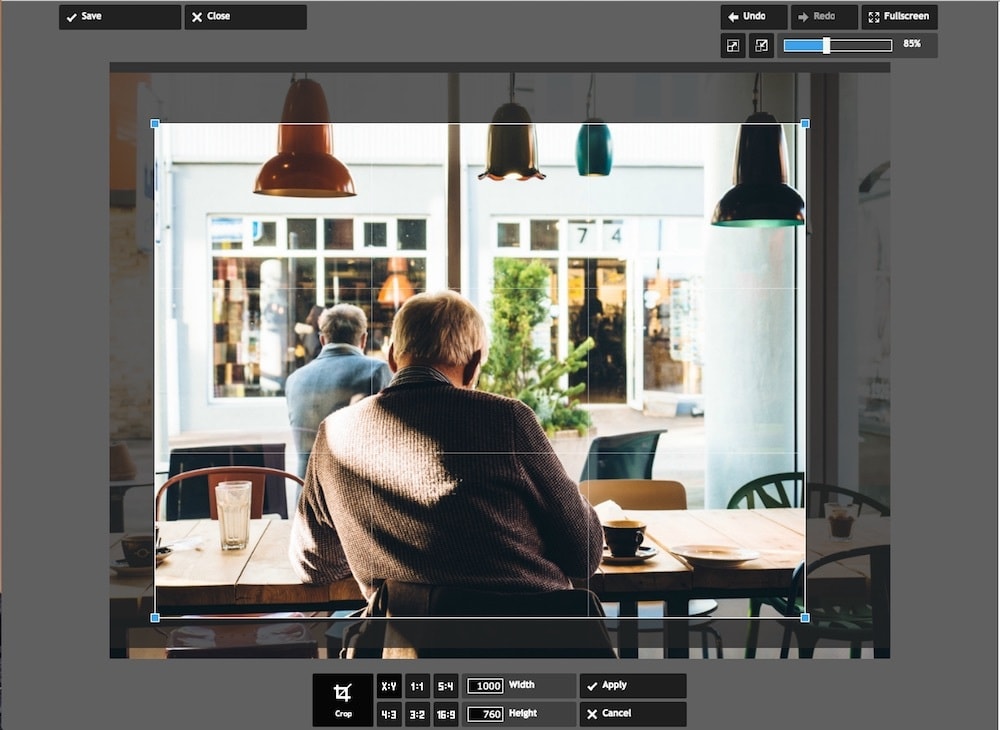
- Utilize a photo tool to resize and ingather the image to the size I want. For this example I chose yard×760. If you wanted a square you could practise thousand×thou.
- Make sure information technology's the correct file size. Once I cropped it to the size I wanted and downloaded it from the photo editor, the file size was 117KB—perfect!
- Upload information technology to your website, and don't forget to fill out the Alt Text! I also added a explanation for adept measure.
Even though this checklist might seem like a lot, it'll get faster once you're used to the process (and you might bookmark this page then you lot can refer dorsum to it).
Plus, going through these step will brand your images look better, help your website load faster, and ultimately benefit your SEO. Become into the correct paradigm habits now, and you lot'll reap the benefits across your entire website. Prepare to become started? Create a business website or portfolio website with Jimdo today!
Learn how to start your own website today!
Source: https://www.jimdo.com/blog/optimize-website-images-for-better-design-seo/
Posted by: healeyhispossiond.blogspot.com
0 Response to "What Size Pictures Are Best For Uploading To A Website"
Post a Comment